
Unleash a world of scientific exploration with the Discovery Mindblown Microscope Set! This 48-piece kit provides powerful magnification – 300x, 600x, and 1200x – for budding scientists.
It’s a complete set, including tools, slides, and accessories, fostering a deeper understanding of biology and science for ages eight and up.
What is the Discovery Mindblown Microscope Set?
The Discovery Mindblown Microscope Set is a comprehensive 48-piece kit designed to ignite a passion for science in young explorers. It’s more than just a toy; it’s a gateway to understanding the microscopic world around us, offering magnification levels from 300x all the way up to an impressive 1200x.
This set boasts a durable metal framework and includes everything needed for full scientific exploration – slides, test tubes, specimen jars, tweezers, and color filters. The built-in light ensures clear observations, making it perfect for preparing and examining your own experiments. It’s a complete learning experience!
Target Age and Skill Level
The Discovery Mindblown Microscope Set is ideally suited for children aged eight years and older, though its engaging nature can captivate anyone with an interest in science. It’s designed to be accessible for beginners, requiring no prior microscopy experience, yet offers enough complexity to challenge and stimulate growing minds.
While the set is user-friendly, adult supervision is recommended, especially when preparing slides or handling smaller components. The kit fosters scientific thinking, observation skills, and a deeper appreciation for the intricacies of the biological world, making it a valuable educational tool.
Unboxing and Component Overview
Prepare for a full scientific exploration! The Discovery Mindblown set arrives with 48 pieces, including a durable metal framework, slides, tools, and accessories for experiments.
Everything needed to dive into microscopy is included, promising hours of discovery and learning for aspiring scientists.
List of Included Components (48-Piece Set)
The Discovery Mindblown 48-piece microscope set is remarkably comprehensive, offering everything a young scientist needs to begin their explorations. Included are prepared slides for immediate viewing, alongside blank slides and coverslips for creating personalized specimens. Essential tools like tweezers facilitate delicate sample handling, while specimen jars ensure safe storage.
Test tubes are provided for conducting simple experiments, and a variety of collecting tools aid in gathering samples from the surrounding environment. Furthermore, the set features color filters to enhance observation detail, and a built-in light source for clear illumination. A detailed instruction manual guides users through each step.
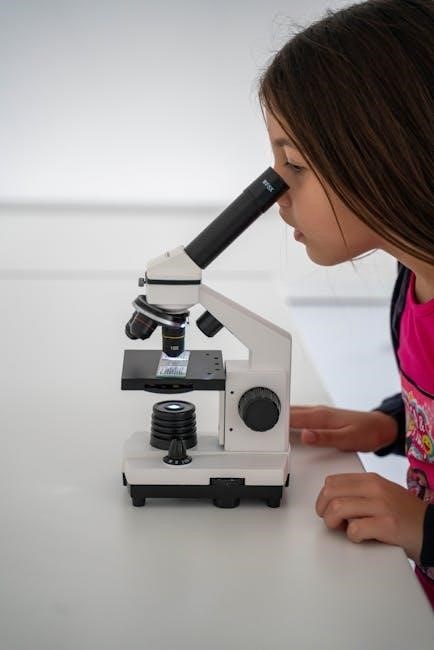
Identifying the Microscope Parts
The Discovery Mindblown microscope boasts a durable metal framework supporting its key components. The base provides stability, connected to a stand that holds the entire optical system. Above this sits the stage, where slides are secured by clips for precise positioning. Crucially, the turret houses the objective lenses – 300x, 600x, and 1200x – allowing for varying magnification levels.
Finally, the eyepiece is where you view the magnified image. Understanding these parts is essential for proper setup and operation, enabling clear and detailed observations of microscopic worlds.
Base and Stand
The microscope’s base is its foundational element, constructed with a robust metal framework for lasting durability. It provides a stable platform, preventing wobbling during observation. Rising from the base is the stand, a vertical support structure that securely holds all the optical components in precise alignment.
This stand is crucial for maintaining image clarity and preventing accidental dislodgement of lenses or the stage. Together, the base and stand ensure a steady and reliable viewing experience, essential for detailed microscopic exploration.
Stage and Clips
Positioned atop the stand is the microscope stage, a flat platform where you place the slides for viewing. It allows for controlled movement, enabling precise examination of different areas of the specimen. Metal clips are integrated into the stage’s design, securely holding the slides in place during observation.
These clips prevent the slide from shifting, ensuring a stable and focused image. Proper slide placement and clip adjustment are vital for clear viewing and accurate scientific investigation.
Objective Lenses and Turret
The Discovery Mindblown microscope features multiple objective lenses, offering varying levels of magnification – 300x, 600x, and 1200x. These lenses are mounted on a rotating turret, allowing for quick and easy switching between magnification powers. Carefully rotate the turret to select the desired lens for optimal viewing.
Higher magnification reveals finer details, while lower magnification provides a wider field of view. Proper lens selection is crucial for observing different specimen characteristics effectively.
Eyepiece
The eyepiece is where you view the magnified specimen. It typically provides 10x magnification, working in conjunction with the selected objective lens to achieve the total magnification. Ensure the eyepiece is securely inserted into the microscope’s head before beginning observation.
Adjust the diopter on the eyepiece, if present, to compensate for differences in vision between your eyes, resulting in a sharper, clearer image. Proper eyepiece adjustment is key for comfortable and accurate viewing.

Setting Up the Microscope
Begin by assembling the microscope base and stand, then carefully install the objective lenses. Next, prepare a slide and secure it with the stage clips for observation.
Assembling the Microscope
Start by carefully attaching the microscope stand to the base, ensuring a secure and stable connection. Next, gently insert the microscope arm into the designated slot on the base, verifying it locks firmly into place.
Then, position the stage above the base, aligning it correctly before securing it with any provided fasteners. Finally, attach the head (containing the eyepieces and turret) to the top of the arm, making sure it’s properly aligned for comfortable viewing.
Double-check all connections to guarantee a sturdy and functional microscope assembly, ready for further setup and exploration!
Installing the Objective Lenses
Begin by identifying the objective lenses – typically labeled with magnification strengths like 300x, 600x, and 1200x. Gently screw each lens into the corresponding slot on the revolving turret.
Ensure they are securely fastened, but avoid over-tightening. Start with the lowest magnification lens (300x) for initial focusing. As you rotate the turret, listen for a click, indicating the lens is properly aligned with the light path.
Confirm each lens is firmly in place before proceeding to slide preparation and observation.
Adding a Slide
Carefully place your prepared slide onto the microscope stage, ensuring the specimen is centered over the light source. Secure the slide using the stage clips – gently tighten them to hold the slide in place without causing damage.
Adjust the slide’s position using the stage controls to precisely align the area of interest with the objective lens. Confirm the slide is stable and won’t shift during observation.
Begin with the lowest magnification and slowly adjust focus before moving to higher powers.

Using the Microscope: A Step-by-Step Guide
Embark on a journey of discovery! Power on the light source, adjust magnification levels (300x, 600x, 1200x), and utilize color filters for detailed observations.
Powering the Microscope (Light Source)
To illuminate your specimens, the Discovery Mindblown Microscope Set features a built-in light source. This ensures consistently clear observations at all magnification levels – 300x, 600x, and 1200x. Typically, this light is powered by batteries, so ensure they are correctly installed in the designated compartment, following the polarity markings.
The light intensity may be adjustable, allowing you to optimize visibility based on the specimen and surrounding light conditions. Experiment with different settings to achieve the clearest possible image. Proper illumination is crucial for detailed microscopic exploration, enhancing the viewing experience and revealing intricate details.
Adjusting Focus and Magnification
Achieving a clear image requires careful adjustment of both focus and magnification. Begin with the lowest magnification (300x) and use the focus knobs to sharpen the view. Slowly rotate the turret to switch between objective lenses, increasing magnification to 600x and then 1200x.
With each increase, readjust the focus. Higher magnifications necessitate finer focus adjustments. Remember that as magnification increases, the field of view decreases. Patience and precise adjustments are key to observing microscopic details effectively with this complete set.
300x Magnification
Starting with the 300x objective lens is ideal for initial observation and locating specimens on your slide. This lower magnification provides a wider field of view, making it easier to scan your sample. Utilize the coarse focus knob for larger adjustments, then refine the image with the fine focus knob.
Ensure the built-in light is on and adjust the brightness for optimal clarity. At 300x, basic cellular structures and larger organisms become visible, offering a great starting point for exploration.
600x Magnification
Switching to the 600x objective lens allows for a closer look at your specimen, revealing more detailed structures. Remember to refocus using both the coarse and fine focus knobs after changing objectives. The field of view will be smaller at this magnification, so precise centering is key.
Adjust the light intensity to maintain a clear image; higher magnification often requires more illumination. Observe details like cell walls and basic internal components with increased clarity at 600x.
1200x Magnification
Utilizing the highest magnification, 1200x, unveils the microscopic world in incredible detail. Expect a significantly reduced field of view, demanding precise specimen centering and careful focusing. Fine adjustments are crucial at this level.
Maximize illumination, as higher magnification necessitates brighter light for a clear image. Observe intricate cellular structures and potentially even microorganisms. Remember that image clarity at 1200x relies heavily on proper slide preparation and careful technique.
Using the Color Filters
Enhance your observations with the included color filters! These filters slide into the designated slot beneath the stage, altering the light passing through the specimen. Experiment with each color – red, blue, and yellow – to highlight specific details.
For example, a blue filter can enhance the visibility of certain cellular structures. Filters aren’t for increasing magnification, but for improving contrast and revealing features otherwise difficult to see. Observe how each filter impacts your view and record your findings!
Preparing Your Own Slides
Become a scientist by creating your own slides! Gather specimens like plant parts or insects, then prepare wet or dry mounts for microscopic viewing.
The kit provides tools for successful specimen preparation and exploration.
Gathering Specimens
Embark on a specimen-collecting adventure! Explore your surroundings – gardens, ponds, even your kitchen – for fascinating samples. Consider thin, translucent materials for optimal viewing under the microscope.

Excellent choices include small leaves, flower petals, insect wings, or even tiny threads. Remember to collect responsibly and ethically, respecting the environment. Prepare to observe the intricate details of the natural world, bringing science to life with your discoveries. The possibilities are endless with a curious mind and the Discovery Mindblown set!
Creating Wet Mount Slides
Prepare a wet mount to observe living specimens! Place your sample on a clean slide, then add a small drop of water. Gently lower a coverslip onto the water, avoiding air bubbles – use a toothpick to help if needed.
The water suspends the specimen for clear viewing. This technique is ideal for observing microorganisms or plant cells. Remember to seal the edges with clear nail polish for longer-term preservation, if desired. Enjoy witnessing life under magnification with this simple, yet effective, slide preparation method!
Creating Dry Mount Slides
For solid, dry specimens, a dry mount slide is perfect! Simply place your sample directly onto a clean glass slide. No water or other liquid is needed for this preparation method. This is best for observing things like hair, fibers, or small insects.
Gently lower the coverslip to protect the objective lenses. Ensure the specimen is flat and not too thick for optimal viewing. Dry mounts offer a straightforward way to examine non-living materials under magnification, providing clear and focused images.

Safety Precautions and Warnings
Always read the instruction manual and container warnings carefully! Avoid contact of chemicals with the body, especially eyes and mouth, for safe exploration.
Handling Chemicals and Specimens
Exercise extreme caution when handling any chemicals included in the Discovery Mindblown Microscope Set. Always supervise children closely during experiments, ensuring they understand the potential hazards. Never allow chemicals to come into contact with skin, eyes, or mouth – immediate rinsing with water is crucial if contact occurs.
Properly dispose of used chemicals according to local regulations. When examining specimens, treat them with respect and avoid direct contact with potentially harmful biological materials. Wash hands thoroughly after handling any specimens or completing experiments to maintain a safe and hygienic environment.
Proper Microscope Usage
Ensure the microscope is placed on a stable, level surface before use. Always carry the microscope with both hands – one on the arm and the other supporting the base; Avoid forcing any parts during assembly or adjustment; gentle handling prevents damage. Begin with the lowest magnification (300x) and gradually increase as needed.
Focus carefully using the adjustment knobs, and never disassemble the microscope beyond the instructions provided. Read all warnings and instructions before operation, and use the product solely for its intended purpose. Inspect for damage before each use.
Troubleshooting Common Issues
If images appear blurry, readjust the focus and ensure a clean slide. For a non-functional light, check the batteries and connections carefully for proper operation.

Blurry Images

Experiencing blurry images is a common issue, easily resolved with a few adjustments. First, carefully re-adjust the focus knobs, ensuring smooth and precise movements. Confirm the slide is clean and properly positioned on the stage, secured by the clips.
Also, verify the objective lens is correctly locked into place. Try starting with the lowest magnification (300x) and gradually increasing it, refocusing at each level. Ensure adequate lighting; adjust the built-in light or utilize external illumination if needed. Finally, double-check the specimen itself for clarity.
Light Not Working
If the microscope’s light isn’t functioning, begin by checking the battery compartment. Ensure batteries are installed correctly, with proper polarity, and are not depleted. Replace them with fresh batteries if necessary. Inspect the bulb itself; though less common, it may need replacing – consult the instruction manual for specifics.
Also, verify the power switch is fully engaged. If the issue persists, examine the wiring connections within the base, looking for any loose or damaged wires. Remember to disconnect power before inspecting internal components.

Resources and Further Exploration
Expand your microscopic journey with online resources and engaging experiments! Discover fascinating tutorials and activities to deepen understanding and inspire scientific curiosity.
Explore biology and science further with readily available online guides and hands-on learning opportunities.
Online Resources for Microscopy
Dive deeper into the world of microscopy with a wealth of online resources! Websites like MicroscopeWorld and educational platforms offer detailed guides, tutorials, and fascinating articles about microscopic techniques.
YouTube channels dedicated to science education provide visual demonstrations of slide preparation, focusing techniques, and identifying specimens. Explore virtual microscope labs for interactive learning experiences.
Educational websites often feature lesson plans and experiment ideas specifically designed for beginner microscopists, complementing the Discovery Mindblown set. Utilize these resources to enhance understanding and expand scientific knowledge.
Recommended Experiments and Activities
Begin with observing everyday objects like salt, sugar, or fabric fibers under different magnifications. Prepare wet mount slides of pond water to discover microscopic organisms – a captivating introduction to biology!
Examine plant cells from onion skin or leaf samples, noting the cellular structures. Investigate the structure of insects’ wings or hair strands for detailed observations.
Conduct experiments comparing different water sources or analyzing pollen grains. Document findings with drawings or photographs, fostering scientific observation and analytical skills with the Discovery Mindblown set.