Prodigy Brake Controller Instruction Manual: A Comprehensive Guide
This manual details the setup, operation, and troubleshooting of your Prodigy brake controller, ensuring safe and effective trailer braking for years to come.
Welcome to the world of enhanced trailer braking safety! The Prodigy brake controller is a sophisticated device designed to provide smooth, proportional braking control for your trailer. This controller utilizes advanced technology to synchronize braking between your tow vehicle and trailer, significantly improving safety and handling.
Whether you’re a seasoned traveler or new to towing, understanding your Prodigy controller is crucial. This manual will guide you through the installation, setup, and operation of your controller, ensuring optimal performance and peace of mind. Proper installation and adjustment are key to maximizing the benefits of this system. Remember, safety is paramount when towing, and a properly functioning brake controller is a vital component of a secure journey.
Understanding Electric Brake Controllers
Electric brake controllers are essential safety devices for towing trailers equipped with electric brakes. Unlike surge brakes, electric brakes require a signal from the tow vehicle to activate. The controller translates the driver’s brake pedal input into an electrical signal sent to the trailer brakes.
These controllers come in various types, including proportional, time-delayed, and slide controls. Proportional controllers, like the Prodigy, apply braking force in direct relation to the tow vehicle’s deceleration, offering smoother and more controlled stops. Understanding the principles of electric braking is vital for safe towing. Proper adjustment ensures the trailer brakes work harmoniously with the tow vehicle, preventing sway and reducing stopping distances. Regular inspection and maintenance are also crucial for optimal performance.
Prodigy Controller Features and Benefits
The Prodigy brake controller boasts several features designed for enhanced safety and convenience. Its proportional braking system delivers smooth, controlled stops by mirroring the tow vehicle’s deceleration. The user-friendly interface allows for precise adjustment of brake sensitivity and proportional gain, catering to diverse trailer weights and driving conditions.
Key benefits include a built-in self-test function for verifying proper operation, a manual override for emergency situations, and diagnostic capabilities to identify potential issues. The controller’s compact design facilitates easy mounting, and its robust construction ensures long-lasting durability. Furthermore, the clear LED indicator lights provide real-time feedback on brake status and system performance, promoting confident and secure towing.

Installation Guide
Proper installation is crucial for optimal performance and safety. This section provides detailed instructions for wiring, mounting, and connecting the Prodigy controller correctly.
Wiring Diagram Overview
Understanding the wiring diagram is paramount before beginning the installation process. The Prodigy brake controller typically requires connections to the vehicle’s brake light circuit, ground, and 12V power source. A dedicated wire runs from the controller to the trailer’s brake wiring harness.
Carefully review the diagram included with your specific Prodigy model, as wiring colors can vary. Ensure all connections are secure and properly insulated to prevent shorts or malfunctions. Incorrect wiring can damage the controller, vehicle’s electrical system, or the trailer brakes.
Pay close attention to the ground connection, as a poor ground can cause erratic controller behavior. Double-check all connections against the diagram before proceeding to the next step.
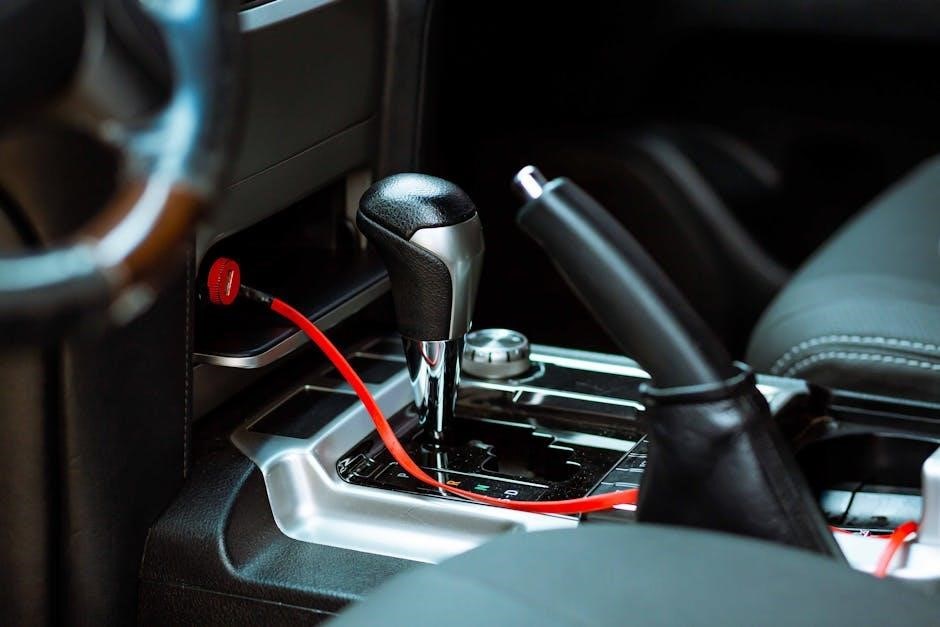
Mounting the Prodigy Controller
Proper mounting ensures secure operation and easy access to the Prodigy brake controller. Choose a location within comfortable reach of the driver’s seat, avoiding interference with steering wheel or pedals. The controller should be mounted firmly to a solid surface, such as under the dashboard or on a console.
Use the provided mounting hardware – brackets and screws – to securely attach the controller. Ensure the mounting surface is clean and free of debris. Avoid locations exposed to excessive heat or moisture.
Angle the controller for optimal visibility of the LED indicator lights. Tighten the mounting screws firmly, but avoid over-tightening, which could damage the controller housing. A stable mount prevents vibration and ensures reliable performance.
Connecting to the Vehicle’s Electrical System
Carefully connect the Prodigy controller to your vehicle’s electrical system, following these steps for a secure and functional setup. First, locate the vehicle’s brake light wire – typically found within the wiring harness under the dashboard. Use a wire connector to tap into this wire, ensuring a solid connection.
Next, connect the controller’s power wire (usually red) to a 12V ignition-switched power source. This ensures the controller only operates when the vehicle is running. Connect the ground wire (usually white) to a clean, unpainted metal surface on the vehicle’s chassis.
Double-check all connections for tightness and proper insulation before proceeding. Incorrect wiring can damage the controller or vehicle’s electrical system.
Connecting to the Trailer Wiring Harness
Properly connecting to the trailer wiring harness is crucial for effective brake control. Locate the trailer connector – typically a 7-way or 4-way flat connector – on your vehicle. Ensure the vehicle’s ignition is off before making any connections.
Plug the Prodigy controller’s wiring harness into the vehicle’s trailer connector. Verify that the brake wire from the controller aligns with the brake input on the trailer connector. Securely fasten the connection to prevent dislodging during travel.
Test the connection by activating the trailer brakes manually. Confirm that the trailer brake lights illuminate; A faulty connection can lead to unreliable braking performance, so double-check all wiring.
Operation and Setup
Successfully operating your Prodigy controller involves initial setup, sensitivity adjustments, and understanding proportional gain for optimal braking performance and trailer control.
Initial Power-Up and Self-Test
Upon initial power-up, the Prodigy brake controller performs a comprehensive self-test to verify all internal systems are functioning correctly. Observe the LED indicator lights; a sequence of illuminated lights confirms successful completion of the self-test. If any lights remain off or flash erratically, consult the troubleshooting section of this manual.
Ensure the vehicle ignition is switched to the “ON” position, but the engine does not need to be running. The controller will automatically initiate the self-test sequence. This process typically takes only a few seconds. A successful self-test indicates the controller is receiving power and that the internal circuitry is operational. Following a successful self-test, the controller is ready for adjustment and use.
Adjusting Brake Sensitivity
The Prodigy controller’s sensitivity adjustment allows you to fine-tune the braking response to match your vehicle and trailer combination. Begin with the sensitivity set to the lowest level. Gradually increase the sensitivity, using the adjustment knob, while observing the trailer’s braking response during a test drive in a safe, open area.
Higher sensitivity settings result in more aggressive braking, while lower settings provide a smoother, more gradual braking experience. Adjust until the trailer brakes respond proportionally to your vehicle’s braking, without locking up the wheels. It’s crucial to avoid settings that cause excessive braking or instability. Remember to test at various speeds and load conditions.
Setting the Proportional Gain
The proportional gain setting on your Prodigy controller dictates how much braking force is applied to the trailer relative to the vehicle’s deceleration. This is a critical adjustment for optimal braking performance. Start with a low proportional gain setting and incrementally increase it during testing.
Observe the trailer’s behavior; the goal is to achieve a braking force that mirrors the vehicle’s deceleration without causing the trailer to push or pull. A higher gain provides more aggressive trailer braking, while a lower gain results in less braking force. Fine-tune this setting until you achieve a balanced and controlled braking experience, ensuring stability and safety during towing.
Manual Override Function
The Prodigy brake controller features a manual override function, providing the driver with independent control over the trailer brakes. This is particularly useful in situations requiring immediate braking force, exceeding the proportional braking system’s response. To activate manual override, firmly press and hold the manual brake control lever.
This bypasses the proportional circuit, applying maximum braking power to the trailer. Release the lever to return to proportional control. Use manual override cautiously, as excessive braking can lead to trailer instability. It’s ideal for steep descents or emergency situations demanding immediate stopping power, offering an extra layer of safety and control during towing.

Advanced Features
Explore the Prodigy controller’s diagnostic mode, emergency breakaway system connection, and adjustments for varying trailer weights for optimal performance and safety.
Emergency Breakaway System Connection
The emergency breakaway system is a crucial safety feature designed to automatically apply the trailer brakes if the trailer becomes disconnected from the towing vehicle. Connecting this system to your Prodigy controller is paramount. Locate the dedicated breakaway output wire on the controller – typically labeled or identified in the wiring diagram.
This wire must be directly connected to the trailer’s breakaway switch. Ensure a secure and reliable connection, using appropriately sized wiring and connectors. Never connect the breakaway wire through any additional switches or relays, as this could compromise its functionality. Regularly test the breakaway system to confirm its proper operation. A functioning breakaway system can prevent runaway trailer incidents, safeguarding lives and property. Proper installation and testing are non-negotiable for safe towing.
Diagnostic Mode and Troubleshooting
The Prodigy controller features a diagnostic mode to assist in identifying potential issues within the braking system. Accessing this mode, typically through a specific button sequence (refer to the full manual for details), displays error codes on the LED indicator. These codes pinpoint problems like short circuits, open circuits, or low voltage.
Consult the troubleshooting section of this manual to decipher each code and implement the appropriate corrective action. Common issues include wiring faults, faulty trailer brakes, or a malfunctioning controller. Always disconnect the controller’s power before inspecting or repairing any wiring. If you encounter a complex issue or are uncomfortable performing repairs, consult a qualified automotive technician. Prioritize safety and accurate diagnosis for optimal performance.
Understanding the LED Indicator Lights
The Prodigy brake controller utilizes a series of LED indicator lights to communicate system status and potential problems. A solid green light typically indicates a proper connection to the vehicle and trailer, with the system armed and functioning correctly. A flashing green light signifies that the controller is actively applying the trailer brakes.
However, amber or red lights signal a fault. An amber light often indicates a weak ground connection or low voltage, while a red light suggests a more serious issue, such as a short circuit or a disconnected trailer wire. Refer to the diagnostic mode section for specific error code interpretations. Regularly checking the LED indicators provides a quick assessment of your trailer braking system’s health and safety.
Adjusting for Different Trailer Weights
The Prodigy controller’s versatility lies in its ability to adapt to varying trailer weights. Heavier trailers require increased braking force, while lighter trailers need a more delicate touch. Utilize the proportional gain adjustment to fine-tune the braking response. Begin with a lower setting for lighter loads and gradually increase it until you achieve smooth, controlled stops without trailer sway.
Always consult your trailer’s manufacturer’s recommendations for appropriate braking force. Incorrect settings can lead to ineffective braking or, conversely, premature brake wear. Regularly reassess the settings whenever you change the trailer’s load or hitch to the vehicle. Proper adjustment ensures optimal safety and performance across diverse towing scenarios.
Troubleshooting Common Issues
This section provides solutions for typical problems, including unresponsive controllers, improper brake activation, LED malfunctions, and wiring connection difficulties.
Controller Not Responding
If your Prodigy brake controller fails to power on or respond to adjustments, begin by verifying the primary power connection. Ensure the controller is receiving a consistent 12-volt supply from the vehicle’s electrical system.
Check the inline fuse located within the controller’s wiring harness; a blown fuse is a common cause of complete failure. Next, inspect all wiring connections for looseness, corrosion, or damage.
Confirm the ground connection is secure and free of obstructions. If the issue persists, attempt a reset by disconnecting the controller from both the vehicle and trailer wiring for several minutes, then reconnecting.
Finally, consult the diagnostic mode (detailed later in this manual) for specific error codes that may pinpoint the problem.

Brakes Not Activating Properly
If the trailer brakes aren’t activating with sufficient force, or are activating unevenly, several factors could be at play. First, re-examine the brake sensitivity and proportional gain settings on the Prodigy controller.
Ensure these are appropriately adjusted for the trailer’s weight and the vehicle’s load. Verify the trailer’s brake drums or rotors are clean and free of debris, and that the brake shoes or pads have sufficient material remaining.
Inspect the trailer wiring harness for damaged wires or corroded connectors, as these can impede the signal reaching the trailer brakes.
Also, confirm the electric trailer brakes themselves are functioning correctly; a manual test can help isolate the issue.

LED Indicator Light Malfunctions
The Prodigy controller utilizes LED indicator lights to communicate system status. If these lights aren’t behaving as described in the manual, it signals a potential problem. A flashing red light often indicates a short circuit in the trailer wiring, while a solid red light suggests a loss of connection.
A yellow light typically signifies a weak ground connection or a problem with the brake signal. If no lights illuminate, check the controller’s power supply and the vehicle’s wiring.
Consult the diagnostic mode section of this manual for more detailed error code interpretations.
Remember to inspect all connections and wiring for damage or corrosion before assuming a controller fault.
Wiring Connection Problems
Loose or corroded wiring connections are a frequent cause of Prodigy brake controller issues. Begin by thoroughly inspecting all connections at the controller, the vehicle’s wiring harness, and the trailer connector. Ensure all connectors are securely fastened and free from corrosion.
A common problem is a poor ground connection, which can cause erratic brake performance or complete failure. Verify the ground wire is firmly attached to a clean, unpainted metal surface.
If you suspect a damaged wire, carefully inspect the insulation for cracks or breaks. Replace any damaged wiring immediately.
Use dielectric grease on all connections to prevent future corrosion and ensure reliable performance.

Maintenance and Care
Regular inspection and cleaning will maximize the lifespan of your Prodigy controller, ensuring optimal performance and reliability for safe towing experiences.
Cleaning the Controller
Maintaining a clean Prodigy brake controller is crucial for its longevity and proper function. Dust, dirt, and grime can accumulate over time, potentially interfering with internal components and electrical connections.
To clean the controller, always disconnect it from the vehicle’s power source first. Use a soft, dry cloth to wipe down the exterior casing, removing any visible dust or debris. For stubborn dirt, slightly dampen the cloth with a mild soap solution – ensure the cloth is wrung out thoroughly to prevent moisture from entering the unit.
Avoid using harsh chemicals, abrasive cleaners, or excessive water, as these can damage the controller’s finish and internal circuitry. Pay particular attention to cleaning around the LED indicator lights and any exposed connectors. After cleaning, allow the controller to dry completely before reconnecting it to the vehicle.
Inspecting Wiring Connections
Regularly inspecting the wiring connections of your Prodigy brake controller is paramount for safe towing. Loose or corroded connections can lead to intermittent brake function or complete failure, posing a significant safety risk.
Begin by visually examining all wiring connections at the controller, the vehicle’s wiring harness, and the trailer connector. Look for signs of corrosion, fraying, or damage to the wires. Gently tug on each connection to ensure it’s secure. If any connections are loose, tighten them appropriately.
For corroded connections, disconnect them and clean the terminals with a wire brush or electrical contact cleaner. Apply dielectric grease to the terminals before reconnecting to prevent future corrosion. If you discover damaged wires, replace them immediately with wires of the same gauge and type.
Long-Term Storage Guidelines
When storing your Prodigy brake controller for extended periods, proper preparation is crucial to maintain its functionality and longevity. Disconnect the controller from the vehicle’s electrical system to prevent battery drain and potential damage. Clean the controller thoroughly with a soft, dry cloth to remove any dust or debris.
Store the controller in a cool, dry place, away from direct sunlight and extreme temperatures. Avoid storing it in areas with high humidity, as this can lead to corrosion. Consider placing the controller in a protective case or bag to shield it from physical damage.
Before reconnecting the controller after storage, inspect all wiring connections for corrosion or damage. Perform a self-test to ensure proper operation before towing a trailer.

Safety Precautions
Always prioritize safe towing practices; regularly inspect your brake system, avoid trailer overloading, and utilize proper braking techniques for optimal control.
Proper Trailer Braking Techniques
Effective trailer braking is crucial for safety. Begin braking early and progressively, allowing the Prodigy controller to smoothly apply trailer brakes. Avoid sudden, jerky movements, as this can cause instability.
Understand that trailer brakes have a slight delay compared to vehicle brakes. Anticipate stops and turns, giving the trailer ample time to respond. Regularly test your brakes on a safe, open stretch of road to ensure proper functionality.
Downshifting can assist in controlling speed, especially on downhill grades. Never rely solely on the brakes; utilize engine braking whenever possible. Be mindful of road conditions – wet or slippery surfaces require increased stopping distances and gentler braking.
Practice emergency braking procedures in a controlled environment to familiarize yourself with the system’s response.
Avoiding Overloading the Trailer
Overloading your trailer significantly compromises braking performance and safety. Always adhere to the trailer’s Gross Vehicle Weight Rating (GVWR) and Gross Axle Weight Rating (GAWR). Distribute the load evenly, with approximately 60% of the weight positioned over the trailer axles.
Uneven weight distribution can lead to trailer sway and reduced braking effectiveness. Securely fasten all cargo to prevent shifting during transit. Regularly weigh your loaded trailer to verify it remains within specified limits.
Remember that the Prodigy controller is designed to work within the trailer’s weight capacity. Exceeding these limits can overwhelm the braking system and increase stopping distances dramatically. Prioritize safety by respecting weight restrictions.
Consult your trailer’s documentation for specific loading guidelines.
Regular Brake System Inspections
Consistent brake system inspections are crucial for maintaining optimal performance and safety. Regularly check brake pads, rotors, and drums for wear and tear. Inspect brake lines and hoses for leaks, cracks, or damage. Ensure all connections are secure and properly tightened.
Verify the functionality of the emergency breakaway system, testing its activation and cable integrity. Lubricate moving parts to prevent corrosion and ensure smooth operation.
The Prodigy controller relies on a functioning trailer brake system; therefore, proactive maintenance is essential. Address any issues promptly to avoid compromising braking ability. Professional inspections are recommended at least annually, or more frequently with heavy use.
Don’t neglect wheel bearings – inspect and repack them as needed.